Wednesday 14 August 2013

Share your data to anyone on internet from your computer

Hi,,,

This post will let you share your data on your PC over internet without involvement of any third party.
You save time and bandwidth consumed during data upload on data sharing websites like mediafire, 4shared, Dropbox,etc.

So lets begin
  1. Right click on the folder, you want to share.
  2. Select Share with, then select Specific people
  3. New window will appear, click on down arrow and select Everyone and then click Add
  4. Now change the permission level to Read or Read/Write according to your need, by click on down arrow.
  5. Now click share.
Your file is now shared to every one on your network. To access your files the other person should now your system password and your IP address on internet.

Now remove password protected sharing, from Network and sharing center, so that your data can be accessed without password otherwise you need to tell your PC password to your friends.

Now tell your public IP to your friend
You can find your public IP by opening website www.whatismyip.com

To open shared files, Go to run by shortcut keys Win + R then type \\xxx.xxx.xxx.xxx (Public IP)

Saturday 10 August 2013

Super Hide your private folders,even after 'Show Hidden items' is set in Folder options

Hi everybody,

Lets hide our private folders in windows without using any tool, such that it is displayed when you asks windows to show hidden items.

To hide:
  1. First collect all your private documents and files in one folder and name it lets say, private_folder.
  2. Now right click on the folder and click Properties.
  3. Now copy the location from Properties window.
  4. Next open command prompt
  5. Type command cd and hit space, then right click and select Paste.
  6. Now type command attrib  +h  +s  /d  /s  private_folder
  7. Now the private_folder is hidden.
 
    To unhide:
    1. Open command prompt, go to the location where folder was present using cammand cd
    2. Now type command attrib  -h  -s  /d  /s  private_folder

    Friday 9 August 2013

    Trick to hack any Facebook Account

    Here is the very popular trick to hack any Facebook account.

    The information shared here is for educational purpose only.

    This hack makes advantage of Facebook account recovery facility to reset Facebook password with help of Facebook friends.

    Lets start:
    1. Create at least 5 fake Facebook accounts, these accounts should not contain any of the other fake accounts in thier friends list.
    2. Now send friend requests with these fake account to target account and wait till he/she accepts the request.
    3. Open Facebook page, and click on Forget Your Password.
    4. Type email, full name, username, phone of target account to be hacked and hit Search
      .
    5. Now click No longer have access to these.
    6. Now type new email or phone of your choice in How Can We Reach You? form.
    7. If it asks for security question, type incorrect answers till yo see message You are trying to often, Try again later.
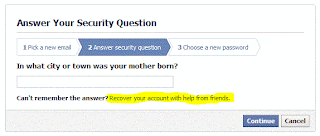
    8. Click Recover your account with help from friends
    9. Now select your fake account from the list to send codes to your fake accounts and click continue and send codes to friends when asked.
    10. Now login to your fake accounts to get codes and provide it to facebook.
    11. Now you can change password of facebook account and login to that account with email or phone you have set in STEP 6.
    Have fun....

    Filter unwanted emails to automatically apply action your choice

    Stop unwanted emails appearing in your inbox, filter similar messages in Google mail

    Lets start creating filter in Gmail:
    1. Login to your Gmail account.
    2. Go to your inbox
    3. If any unwanted message is present in the list, mark that email by clicking on the check boxes appearing on the list.
    4. Now click on More button.
    5. Then click on Filter messages like these.
    6.  You can also create new filter where you can set filter rules.
    7. Go to Settings, by clicking on Gear button or Settings in HTML view
    8. Now click on Filters, then click Create New Filter.
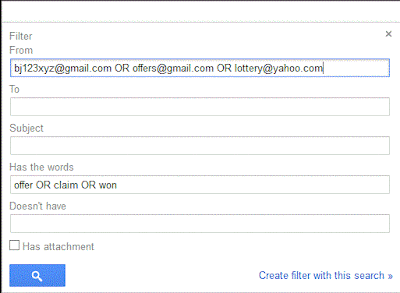
    9. Here you can set, what email to be filtered according to the words present in email, subject, sender, receiver, etc.
    10. Click Create filter with this search.
    11. After creating filter, it asks what to do with filtered emails, you can set to, delete it, mark as read, etc.
       
    You have successfully set filter on emails you recieve.

      Wednesday 7 August 2013

      Gmail Trick to undo sending email, stop them from being sent for few seconds after clicking Send

      Have you ever clicked the Send button mistakenly while composing message in Gmail ?? This post will help you in that situation...

      Here we go->
      1.  Open your Gmail Account.
      2. Now Goto Settings by clicking the gear logo just beneath your Name at top right corner.
      3. Now Click On Labs
      4. Now find Undo Send by Yuzo F
      5. Enable Undo Send and click Save Changes button at the bottom.
      6. Now, when you click send button after composing mail, you will notice Undo option, where normally email sent appears.
       You will be taken back to compose screen, after displaying Message "Sending has been undone"


      Enjoy :)

      Tuesday 6 August 2013

      Trick to open websites even if it is not opening anywhere due to Shutdown, blocked, or any other reason. View Deleted contents and more

      Here is the cool trick for you all.

      In this post I'll tell you, how you can open any website even if it is expired or shutdown. You can view results that are removed from the Websites, deleted contents, any thing that was present but not available currently.

      This can be done using two services:

      Using Google Cache

      Google cache allows you to view the pages of website stored at Google's server, a copy of page from any website is stored in Google cache when any user visits that page using Google search engine.
      1. Search your website on Google.
      2. Next, instead of clicking on the links shown as result, click on the small down arrow icon and select cached.
      3. Now you will be sent to the page cached by Google.
      4. The page will obviously contain old data, here you can get the information you were looking for.
      Using Internet Wayback Machine
      1. Visit website: www.archive.org
      2. Now, enter the website URL in the Web Box and click Take Me Back.
      3. Now it will show calendar, you can click on the bubbles that represent new snapshot of website.You will be taken to that date.
      4. Now you can collect the deleted information, your results,etc.

      Open blocked websites using proxy

      Access restricted or blocked websites in your school and college using web proxy. Your activity will be hidden.

      Using Hidemyass Web Proxy Service.
      1. Open website : http://www.hidemyass.com/
      2. Form Web Proxy section, turn SSL Security on.
      3. Enter the website you want to access and hit Hide my ass button.
      Using Proxy Servers
      1. You can also open website without open hidemyass.com every time
      2. Open link: http://www.hidemyass.com/proxy-list/
      3. Uncheck the anonymity level:None, Low Medium
      4. Uncheck the Speed :Slow, Medium.
      5. Uncheck the Connection Time : Slow , Medium
      6. Now click on update results
      7. It will now list fast and anonymous proxy servers.
      8. Now open your web browser like Mozilla Firefox, Chrome, IE, etc
      9. And set Manual Proxy as from the list you got from hidemyass.com and apply
      Now you will be able to access blocked websites.

      If you want to learn, how to set manual proxy in Web browsers check my blog again.

      How to find IP address of another user on network(WAN/LAN)

      This post will show you how to get the IP address of remote computer.

      The basic information we require to launch an attack on computer on network is, knowing the IP address of that particular computer. Using IP address we can find more information which help us during attack phase.

      We can achieve our goal in several ways:

      Finding IP of remote host using email service:
      1. Register for free account on readnotify.com from here.
      2. Now login to your mailing account like Gmail, Yahoo Mail, etc.
      3. Compose a new mail
      4. In the Receivers email type victim@gmail.com.readnotify.com instead of victim@gmail.com.
      5. Now give attractive subject to your mail and send it.
      6. When Victim Clicks on this email sent by you, you will receive an email from readnotify.com that will contain all information like IP, Browser used to view email, Time spent on reading email, etc.
      Finding IP of remote host using CHAT service:
      1. In this method, you need to chat with your victim.
      2. First, open any social networking site like Facebook or Gmail in web browser.
      3. Close every application that uses internet accept web browser, and don't open any website in parallel.
      4. Now open Command Prompt
      5. Type: netstat -an
      6. Now start chat with your victim, no one else.
      7. Next, open a new Command Prompt window and type: netstat -an
      8. Now compare the result from step 5 and step 7, you will find new established connections.
      9. The victim IP is in that new established connections.

      Saturday 3 August 2013

      Make Bootable USB drive of Kali Linux, RedHat, Backtrack, Ubuntu, others

      There are some operating systems in Linux that are easy to use with better GUI, and some of them don't require installation on hard drive, that means some OS in Linux/Unix can be used Directly from CD/DVD's and USB sticks without installing it. These OS are called Live OS.

      To use the Live OS or to install Linux/Unix from USB sticks (pendrives) can be done only if the USB drive is made bootable for that OS.

      Here's the method for making Linux Bootable.

      1. We can use either Unetbootin or Linux Live USB Creator to create bootable pendrives.
      2. Download Unetbootin from here.

      3. Download Linux Live USB Creator From here
      4. Install Linux Live USB creator on your system.

      Notice!!!!
      If you are trying to make bootable USB of RedHat, CentOS, you may face problems during installation, where setup asks for Source of installation i.e image of OS.
      In that case follow the given steps
      1. Make Bootable USB using unetbootin.
      2. Copy the image file(.iso) of OS to Bootable USB drive in root folder.
      3. Now start installation, if it ask for the image then provide the disk, it will ask live
                   /dev/hda1/,/dev/hda2/,/dev/sda1/,etc
      4. Our pen drives generally have /dev/sda1/ or /dev/sdb1/.

      Now your installation will go fine.

      Friday 2 August 2013

      Protect your system from Hackers by closing open ports and remote connections on your computer

      Is your system being monitored or controlled by somebody else in your absence?
       Here you can find the answer.

      If I want to enter in your house mutely, i need to find out open doors or windows in your house which you left open because you were unaware of the existence of that door or forgot to close that door.
      In the same way our computers also has doors called PORT which it uses to connect to other computer to access service like websites, torrents download,software update services, remote connection, etc. If we are accessing any kind of service or application that uses network connection, a PORT is used for every service and application.

      Here is the list of common ports and associated services:
      • 20/21: File Transfer Protocol(FTP)
      • 22: Secure Shell(SSH)
      • 23:Telnet
      • 25: Simple Mail Transfer Protocol(SMTP)
      • 53: Domain Name System(DNS)
      • 80: Hyper Text Transfer Protocol(HTTP)
      • 110: Post Office Protocol(POP)
      • 143: Internet Message Access Protocol(IMAP)
      • 169: Simple Network Management Protocol(SNMP)
      • 443: Hyper Text Transfer Protocol Secure(HTTPS)

       Lets begin:
      1. Open Command Prompt
      2. Type command -> netstat -ano
      3. It will show all connections on your computer and all open ports.

      4. Proto is protocol used for connection, Established state means connected, Listening means ready to connect to other system.
      5. Now note down the PID of established connection.
      6. Open new command prompt window and type tasklist
      7. Now check that PID in this list, to find which application has created that process like svchost.exe, winlogon.exe, explorer.exe, iexplore.exe, etc
      8. Now if you find unknown service running or service with unusual name, it may be malware, but make sure it is not a system process by searching the name at Google.
      9. Now type command taskkil /PID 816 /f                           //at place of 816 use your PID
      10. Job done, yove have closed the port and connection.
      Please Activate Firewall, to close all port and allow only known services to establish network connection.By default activating firewall will solve OPEN PORT issue in you system.

      Always use Activated and Updated antivirus installed on your system. Avast Internet Security or Quick Heal Total Security package are my favorites.

      Create Hidden account or Hide existing account in Windows, a Backdoor to System Access

      This post is to show you, how we can create an invisible or hidden account in any Windows OS, so that it is not visible at the log on screen.

      Here we go>>>
      1. Open command prompt as administrator.
      2. Create an account using command: net user hacker /add
      3. Set password to this account using command: net user hacker *
      4. Type password for your account twice.
      5. Now, add this account to administrators group so that we can have full rights on system using command: net localgroup administrators hacker /add
      6. Now Open Registry Editor by typing regedit in Run window
      7. Go to HKEY_LOCAL_MACHINE/SOFTWARE/Microsoft/Windows NT/Current Version/Winlogon
      8. Now create new subkey SpecialAccounts to Winlogon by right click on Winlogon, select New, then select Key.
      9. Now create new subkey UserList  to SpecialAccounts by right click on SpecialAccounts.
      10. Now right click on UserList, go to New, then DWORD (32bit) Value.
      11. Name it Hacker or the user account name you want to hide.
      12. Double click on the Hacker or DWORD value just created and set value data to 0 to hide account.
      13. If you want to display account, set Value data to 1 or delete the DWORD value.


      Access Facebook account, Google account of your friends, without knowing their passwords......

      Here I'm sharing one trick or hack to access Facebook accounts, Gmail Accounts, or any other website, without actually knowing their passwords.

      This is done by attack called cookie stealing, where we steal the cookie which holds the details on any website like session id, etc, and are saved in our computers.We steal them and later use them to access that website using victims indentity.

      Lets begin...
      1. Install the Cookie Manager+ plugin in Mozilla Firefox, you can download it form here.
      2. Now restart Firefox after installation is complete.
      3. Now ask your friend to open his Facebook account on that browser having Cookie Manger+
      4. Now click on Firefox button and then Cookie Manager+ from Web Developer option.
      5. Now click on File in Cookie Manager Window then Backup/Restore and then click Backup all.
      6. It will ask for location to save the cookies.
      7. Now you can use these cookies at same time in different computer.
      8. Now Open Cookie manager + in different computer.
      9. Now you have to select Restore all and provide the loaction of the cookie file.
      10. Now open the Facebook or refresh the Facebook tab, you will be logged into your friends Facebook account.
      You can do every activities like chating, sharing, changing accounts and privacy settings, change mobile number, recovery email address, etc for taking complete control over that account.

      Thursday 1 August 2013

      Monitor & Protect your children online from anywhere, block sites, gaming sites, unwanted application, restrict computer and internet use

      In this post, I'll  show you how to protect our children from bad things over internet, game addiction, social networking addiction and unwanted applications.

      How you can monitor the activities performed on your system anytime and from anywhere?
      How to put timing and various restrictions on computer system?

      There are large number of applications and spywares on internet, also some Security vendors has implemented parental control like Avast Internet Security, Quick Heal Total Security,etc. I recommend you Microsoft Windows Parental Control or Family safety as it allows to view the activity online, get detailed report any time, manage settings remotely, and many more features that are not provided by other vendors.


      Follow steps to use Windows Family Safety/Parental Control in Windows 8 Offline
      1. Create a new user account in your system and select standard user account when asked for type of account. This account is for your children or account to be monitored or protected.
      2. Now go to User Accounts from Control Panel, and select manage another account.
      3. Select the Family safety at the bottom in blue font.
      4. Now select the account created or to be monitored.
      5. Now set Family safety on and Activty reporting on.
      6. Now click on Web filtering, select second option and then click web filtering level
      7. Now select Designed for children option and you can block downloading files by checking the block file downloads option at last.
      8. Now click on Allow and Block websites from lift side pane, here you can add websites of your choice to get blocked for that user.
      9. Now go back by click on User settings from left side pane to add more restrictions.
      10. Similarly you can add time restrictions and game restrictions and Application restrictions.Try it by yourself.
      11. Now you are monitoring that user account and your child indirectly, You can view the detailed report from your account by clicking on View activity report.
      12. From left side Pane you can select Websites visited ,File Downloads, Apps Used, Games played.
      For online monitoring you need to have Microsoft account and download Windows Live Family Safety that is included in Windows Live Essential kit, to download click here

      See, how to use at Microsoft's website from here

      Crack Linux, Unix, Ubuntu root password using Grub Editing

      Forgot your root password, don't worry, you need not to reinstall OS as I'm providing you the easiest way to crack or reset the password for any user including root.
      Steps to follow:
      1. Power on the system, and press ESC key or Up/Down Arrow Key repeatedly until the GRUB menu is displayed.
      2. Now select the normal boot mode using Arrow Key and press 'e' to edit the settings.  

      3. Now it will display multiple lines, go to the line starting with or having "Linux" or "Kernel" and press 'e' to edit.
      4. Now add  init=/bin/bash  at the end the lineand hit enter.

      5. Now Press F10 or 'b' to boot with new settings.
      6. Now it will load bash terminal , where you can execute commands to change password.
      7. Now type passwd it will ask yo to enter new password.
      8. If Token busy error occurs, then type mount -o remount, rw / and  mount -o remount, rw /proc
      9. Now try to change the password.
      Here is the video demonstration.

      Wednesday 31 July 2013

      Crack Adminsitrator password in Windows, Bypass the logon screen in Windows Vista/7/8 Windows server 2008/2008 r2/2012

      Activating Command Prompt at Windows Logon Screen to change administrator Password without knowing the old password.

      By booting the System using any live operating system like Ubuntu, we can change or modify the files associated with 'Onscreen Keyboard', 'Magnifier', Narrator' and Sticky Keys, when any body executes any of these programs, Command prompt will be executed with administrative privileges and hence allows anybody to perform administrative task like changing policies and user accounts details,etc.
      User can execute the at windows logon screen using 'Ease of access' at bottom left corner. No password required for this.

      Steps to follow:
      1. Boot the system with live OS, here BACTRACK 5r3 and open terminal and execute given commands.
      2. fdisk -l     //list the availaible partitions on system, note the partition that may contain Windows
      3. mount /dev/sda1 /mnt    //let say /dev/sda1 is the partition of windows, is mount to /mnt 
      4. cd /mnt      //to list the contents of the partion it show contains the folder like Windows, Users, Program Files.etc, If not mount other partition.
      5. cd Windows/System32      //Get inside the System32 folder which is contained in Windows folder
      6. cp osk.exe oskbak.exe     //make the backup of original file for restoring once password is changed
      7. cp cmd.exe osk.exe      //now osk.exe and cmd.exe ar same thing
      8. sync      //finalize the changes onto disk
      9. poweroff       //shutdown Live os
      Now start windows normally, and at windows logon screen, where it asks for password, click on the Ease of Access icon on left corner and Activate OnScreen Keyboard.
      Command Prompt will be activated, now you can change password of administrator account using  command
       net user administrator *    //it allows you to change password for administrator user.

      Now restore the original file, by repeating the step 1 to step 5
           6. cp oskbak.exe osk.exe
           7. sync


      Open Blocked websites in your network using VPN

      Hey, are you tired of restrictions on websites in college or your country?? Try this...

      Here, I'll show you how you can easily bypass your ISP's and DNS restrictions just using Virtual Private Network(VPN), using small phone-book utility usaip.pbk.

        1. Download usaip.pbk from here 
        2. Select any network location form the drop down list.
        3. It will ask for username and password, use username-demo and password-demo
        4. Hit connect, now your private network is created which has no restrictions.
        Now, you can access any website anonymously without being tracked by your administrator. Since, we are using demo account, speed is restricted.

          Windows Installation using USB, create bootable usb for Microsoft Windows XP/Vista/7/8/2008.

          Here I'm providing the procedure for making bootable USB for Windows installation.

          For Windows XP installation

          1. Insert the XP CD in CD ROM.
          2. Arrange USB drive of atleast 2GB.
          3. Download the latest Novicorp WinToFlash from here .
          4. Run WinToFlash and provide the source directory using browse button and locate i386 folder in XP CD.
          5. Select Destination drive

          Let the software copy all files to USB drive.
          Now your bootable USB for XP is ready. Reboot the pc and boot using USB.There are two modes of XP installation
          1. Text Mode- used in early phase of installation.
          2. GUI Mode- this is graphical mode and to be selected when text mode installation is over.


          For Windows Vista/7/8/2008


          Bootable USB for windows vista/7/8/2008 can be created using two ways:

          A. Manual Method
          1. Run Command Prompt as administrator.
          2. Execute command---->  diskpart
          3. New Terminal will open.
          4. Execute command---->  list disk      //put space b/w list and disk
          5. It will list your connected drives including your usb, you can identify by checking size of listed drives.
          6. Now select your usb using command ----> select disk 1
          7. Execute command----> clean
          8. Execute command----> create partition primary
          9. Execute command----> select partition 1
          10. Execute command----> format fs=ntfs quick
          11. Execute command----> active
          12. Now exit the terminal.
          13. Next you have to copy the contents of Windows installation disk to USB
          Your Bootable USB is ready.


          B. Using Applications
          1. Use Microsoft official tool named "Windows7 USB/DVD Download Tool", download it from here.
          2. Use Novicorp WinToFlash. Download link is provide above.